


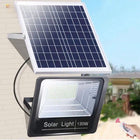


Solar Lights for a Side Gate: See the Latch Before You Reach It

For a side gate, place solar lighting where it reveals the latch and the ground before you reach the opening. One fixture can serve an unobstructed entrance; a second becomes useful when the gate or a wall blocks a separate part of the route. Start with a sun-exposed fixed mounting point and choose the operating mode around how you actually use the gate.
Follow the journey through the gate
A side gate is a moving doorway. Its lighting has to work while you approach, find the release, swing the gate, and pull it closed behind you. A lamp that makes the fence look bright from the patio can still leave your fingers or the next step in shadow.
Picture returning from the bins with one hand occupied. You need to recognize the latch before reaching for it, see where the open gate will move, and find the inside handle after passing through. These are separate viewing positions, even though they occupy a small area.
| Moment | Useful view | What can change it |
|---|---|---|
| Approaching a closed gate | The release or keyhole and the ground in front of it | A solid gate can hide a lamp or sensor on the far side. |
| Reaching for the latch | The hardware while your hand is beside it | Your shoulder or forearm can interrupt light from behind you. |
| Opening and passing through | The threshold and first step beyond it | The moving gate can cross the beam or hide a previously visible patch of ground. |
| Closing from the other side | The inside handle and latch engagement | You now face the opposite direction and may be outside the original sensing field. |
This table is a layout check, not a requirement to install four lights. A good position may cover several moments. It also gives you a more useful shopping question than simply asking which lamp has the highest output.
Choose the position with the gate in motion
Let the light reach the hand, not just the fence
Consider a position above and slightly beside the latch area, with light falling toward the hardware and the walking surface. Stand where you normally unlock the gate and bring your hand to the release. If your body casts a shadow exactly where you need to see, compare a position on the other side of that standing spot.
The best side depends on the hinge direction, the approach, and the mounting surfaces. A hinge-side wall can work when it has a clear view across the opening. A latch-side wall can work when the lamp stays clear of the gate and illuminates the hand from the side. Neither label settles the choice by itself.
Keep checking as the panel swings
Compare the closed, partly open, and fully open positions from both approaches. Pause at the angle you normally use to carry a bag or roll a bin through, and watch where the shadow moves. A bright latch with a dark landing beyond it calls for a different position or additional coverage of that landing.
Use a fixed wall or suitable stationary support so the lighting position stays predictable as the gate moves. Keep the fixture and its bracket outside the full swing and away from latch hardware. For the structural choice between fence surfaces, see our guide to solar lights on fence posts versus panels.

One light or a second light on the return side?
Start with one fixture when the approach, latch, threshold, and return handle remain visible from one suitable mounting position. An open metal gate may let more light reach through the opening than a solid panel, but check the actual shadows around the lock and posts.
Consider a second fixture when the return approach is hidden behind a solid gate or a corner, or when opening the gate creates a distinct dark area beyond it. Give that second light a specific job: revealing the inside handle or the landing that the first fixture cannot reach. Two lights placed together on the same side may leave the original obstruction unresolved.
Increasing output at the first position will not move a solid obstruction out of the light path. Conversely, if one fixture already makes the full trip comfortable, an extra lamp may add glare without improving visibility. The U.S. Department of Energy's outdoor-lighting guidance emphasizes matching light to its purpose, direction, level, and timing. Apply that idea to the part of the gate journey that needs improvement.
Choose a mode for the time you spend at the latch
Motion-only light suits a gate used briefly after dark when illumination begins early enough on the approach. Test from both directions after allowing the lamp to return to its resting state. A sensor's listed range describes detection; it does not describe how far the light makes the ground useful to you.
Dim-to-bright operation is a useful alternative when you want an orientation glow before the brighter response. It can also make the transition less abrupt while looking for a key. Check that the background level is useful at the latch and that the bright period covers your usual opening routine.
A constant setting can fit a planned evening of repeated trips through the gate. Choose it according to the model's stated runtime and the available solar charge. For occasional access, begin with a responsive mode and evaluate it on a normal evening, including the return trip.
Two NoxLumin options for different side-gate layouts
A compact wall position: 112-LED Solar Motion Sensor Wall Light
The 112-LED Solar Motion Sensor Wall Light fits a sun-exposed exterior wall beside the gate. Its body measures approximately 7.5 × 6.0 × 1.8 in (19.0 × 15.3 × 4.5 cm), making it a practical option where a shallow wall fixture suits the passage.
It combines a 120° PIR sensor, a 2200mAh battery, IP65 weather resistance, and four modes: dim plus motion bright, motion-only bright, constant strong, and constant weak. The listed motion-triggered bright period is approximately 13–15 seconds, extending while motion continues. Constant strong is listed at about 4 hours and constant weak at about 8 hours. These are operating-mode estimates, so match the setting to your evening routine and the available charge.
Warm White 3000K and Cool White 6500K versions are available. The 3000K option is a useful starting point for a residential side passage where a warmer appearance is preferred. Its integrated panel makes direct sunlight at the actual wall position part of the placement decision.


A gate with a suitable pillar: Solar Radar Wall & Pillar-Top Light
The Solar Radar Motion Sensor Wall & Pillar-Top Light offers included wall and pillar-top mounting accessories, a listed 1,400-lumen output, a 6000mAh battery, and IP65 weather resistance. Its 180° radar sensor has a listed typical range of 16.4–32.8 ft (5–10 m). Position and test it for the approaches you want to illuminate.
The square top measures 7.28 × 7.28 in (18.5 × 18.5 cm). Overall height is 7.87 in (20 cm) in the pillar-top configuration or 10.24 in (26 cm) when wall mounted. Check the mounting adapter and fixing requirements against the pillar cap; the top's dimensions are not the base footprint.
Choose between 4000K and 6000K versions. Dim-to-high provides a low background level with a brighter motion response; motion-only gives about 20 seconds of bright light per activation. Constant low uses 25% output with a listed 8–10-hour runtime after a full charge. Constant medium uses 50% output and switches off automatically after 4 hours. The top-mounted integrated panel needs an exposed charging position. Our wall-mounted versus pillar-top guide covers the mounting comparison in more detail.


Finish with sunlight, comfort, and a realistic evening check
Check the proposed panel position during the day, including shade from the house, fence, trees, and seasonal growth. A sunny opening nearby does not establish that a panel against the wall receives the same sunlight. Favor a position that supports both charging and the gate-use sequence.
After charging, repeat the complete gate journey in the selected mode, allowing motion lighting to settle between approaches. Look back toward the fixture at normal eye level and from nearby seating. Fine-tune the position if the source is distracting or lights a neighboring window.
DarkSky and the Illuminating Engineering Society recommend useful, targeted lighting at the lowest practical level, with controls and warmer colors where possible. For this entrance, success means seeing the hardware and walking surface comfortably throughout the trip. Explore motion sensor solar lights once you know which mounting position and operating mode serve that job.
Frequently asked questions
Where should a solar light go beside a side-gate latch?
Do I need a solar light on both sides of a solid gate?
Why does my gate light detect me only when the gate is open?
Which mode suits a gate where I stop to find my keys?
Can an integrated solar gate light work in a shaded side passage?
Can I attach the solar light to the moving gate?
Is warm white suitable for a side-gate light?
Get more NoxLumin guides on Google
Add NoxLumin as a Preferred Source to help Google show you more of our outdoor lighting guides in Search and AI experiences.


Leave a comment